Summary
An SRV record specifies the hostname and port for the Minecraft server, making it easier for players to connect using a custom domain name. Creating an SRV record in your billing panel ensures that your Minecraft server is easily accessible for your players. The guide below will walk server admins through setting up an SRV record using the billing panel. Creating an SRV record can improve your Minecraft server's visibility and create a seamless experience for your players. For servers with a dedicated IP, go here to create an A record instead.
| Note | This tutorial is only for servers without a dedicated IP. For Premium Minecraft Servers or Budget Servers with a dedicated IP add-on, learn how to create an A record here. |
How to Create an SRV Record for Minecraft in the Billing Panel
1. Log in to the BisectHosting Client panel.
2. Under Domains, choose My Domains.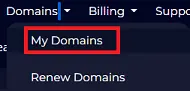
3. Press the wrench icon next to the desired domain.![]()
4. Under the Manage tab, select DNS Management.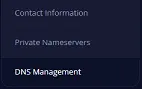
5. Click Add A New A Record.![]()
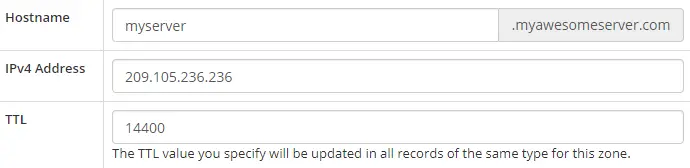
6. Fill in the prompted fields with the following information:
Hostname - Enter myserver (In this example, myserver.myawesomeserver.com is directed to the server's IP)
IPv4 Address - The Minecraft server IP without the port
TTL - Use 14400
7. Press the Add Record button.![]()
8. Under the DNS Management panel, select Manage SRV Records.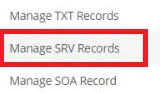
9. Click Add A New SRV Record.![]()
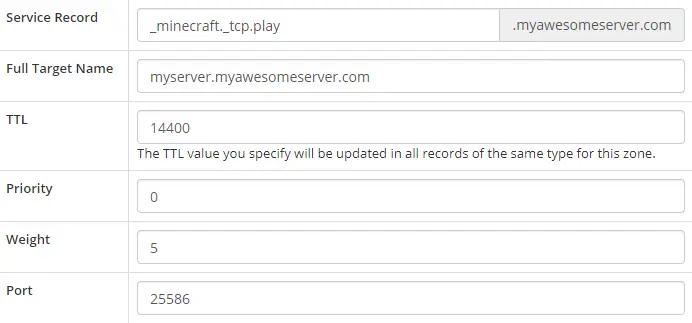
10. For desired domains such as play.yourdomain.com, mc.yourdomain.com, or factions.yourdomain.com to connect to the server then follow the steps below. For just the base domain to point to the server, skip to the next step.
Service Record - The desired subdomain along with the protocol/service. In this example, _minecraft._tcp.play is used. (Do not forget to include _minecraft._tcp. before the desired subdomain)
Full Target Name - Enter myserver.yourdomain.com (Changing yourdomain.com with the desired domain name)
TTL - Use 14400. Other values can be used if the user knows exactly what this is, and how to use it.
Priority - Use 0. Other values can be used if the user knows exactly what this is, and how to use it.
Weight - Use 5. Other values can be used if the user knows exactly what this is, and how to use it.
Port - The Minecraft server port without the IP
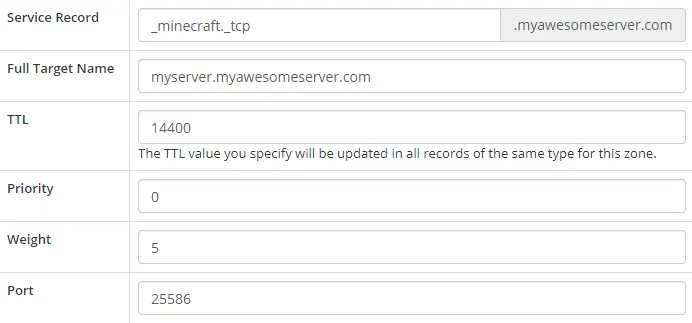
11. Enter the following information to connect to the server using just the base domain:
Service Record - Enter _minecraft._tcp
Full Target Name - Enter the full Hostname from Step 6.
TTL - Use 14400. Other values can be used if the user knows exactly what this is, and how to use it.
Priority - Use 0. Other values can be used if the user knows exactly what this is, and how to use it.
Weight - Use 5. Other values can be used if the user knows exactly what this is, and how to use it.
Port - The Minecraft server port without the IP
12. Click Add Record. DNS will start to update and may take a while.![]()

