
Summary
Admin permissions are essential for managing and maintaining a 7 Days to Die server. It allows you to perform various tasks, such as kicking or banning players, changing server settings, and managing server mods and plugins. Using admin permissions responsibly and moderately is vital to ensure a positive and enjoyable experience for your community.
How to Give Admin Permissions on a 7 Days To Die Server
1. Log in to the BisectHosting Starbase panel.
2. Stop the server.![]()
3. Go to the Config Files tab and choose Server Admin Config.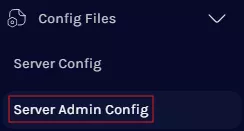
4. Navigate to <users> and uncomment the following line by removing the <!-- and --> at the beginning and end of the code.![]()
![]()
5. Ensure the Platform is set to Steam .
6. Replace the ID after userid= with the desired SteamID64. Learn how to get SteamID64 here.
7. Enter a new name after name= . This is used to identify different administrators.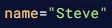
| Note | Copy and paste the entire line starting from <user and change the respective Steam IDs to add multiple admins. |
8. Press the Save button.
9. Start the server.![]()