How to install Quilt on a Minecraft server


Summary 
Quilt is a lightweight modding API for Minecraft that aims to simplify the process of creating and maintaining mods, making it more accessible to developers and players alike. It is designed to be compatible with Fabric, another popular mod loader. Quilt enables players to easily load and manage Quilt-based mods in Minecraft, allowing them to enhance their gameplay experience with custom content, new features, and other modifications.

Note Access to installing Quilt via the JAR Menu is limited to Premium servers or Budget servers with BisectBoost. Alternatively, Quilt can be installed manually by following the guide provided below.

Note The server must fully start once to generate config files and folders.


How to Install Quilt on a Minecraft Server (JAR Menu)
1. Log in to the BisectHosting Games panel.

2. Stop the server.


3. Go to the Minecraft Jar tab.


4. Select Quilt on the left.


5. Next to the preferred version, click Install.
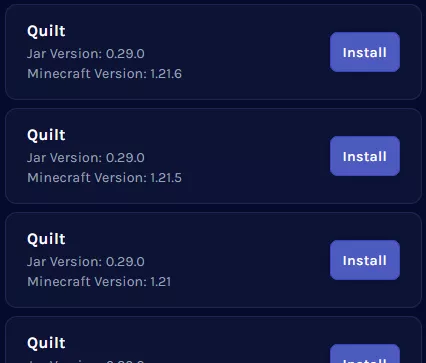

6. Press the Install button.


7. Choose what to do with the existing server files and click Next.
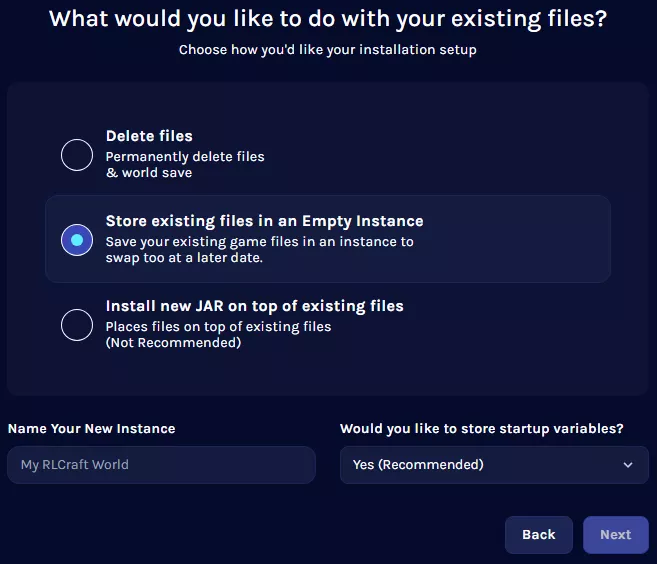


8. Start the server.


How to Install Quilt on a Minecraft Server (Manual)
1. Download Quilt.

2. Launch the Quilt installer and select the Server tab.


3. Choose a Minecraft version.


4. Change the
Install location to a folder on the desktop.


5. Click
Install .


6. Once finished,
navigate to the folder on the desktop.


7. Rename quilt-server-launch.jar depending on the Minecraft version from step 3:

Minecraft 1.14-1.16.x = custom.jar
Minecraft 1.17.x = customjava16.jar
Minecraft 1.18-1.20.4 = customjava17.jar
Minecraft 1.20.5+ = customjava21.jar


8. Select all files. Right-click and choose  Send to>Compressed (zipped) folder


9. Minimize the file to use later in the tutorial.

10. Log in to the BisectHosting Games panel.

11. Stop the server.


12. Go to the Minecraft Jar tab.


13. Select
Custom on the left.


14.
 Click Install next to the custom jar version from Step 7.


15. Press the Install button.


16.
Choose what to do with the existing server files and click Next.


17. Go to the
Files tab.


18. Upload 
the .zip file from Step 9.


19. Right-click on the
.zip file and choose Unarchive.


20. Start the server.


Was this answer helpful?

2
« Back