
Summary
Installing mods on a Project Zomboid server can bring a range of benefits to both server admins and players. Mods can help enhance the gameplay experience by adding new content, features, and mechanics unavailable in the base game. It can include new items, weapons, vehicles, maps, and gameplay systems that add depth and variety to the game.
| Content | Description |
| How to Install Workshop Collections | Install mods through a workshop collection ID |
| How to Install Mods (Preset) |
Install mods to the server using a client preset. |
| How to Install Mods (Client Manual) |
Manually install mods to the client. |
| How to Install Mods (Server Manual) |
Manually install mods to the server. |
| How to Fix the Mod Anti-Cheat Error | For Mod Anti-Cheat errors like:ZNet: OnValidateAuthTicketResponse response=AuthTicketCanceled SteamID=ZNet: Auth failed response=AuthTicketCanceled state=3 SteamID= |
| Note | Adding mods can potentially corrupt existing save files. Check the mod description on Steam to verify save compatibility. |
How to Install Mods on Project Zomboid (Preset)
1. Launch Zomboid.![]()
2. Open the Workshop menu.![]()
3. Choose Open Steam Overlay to Spiffo's Workshop.![]()
4. Subscribe to the desired mods.![]()
5. Return to Zomboid and click Back.![]()
6. Open the Host menu.![]()
7. Press the Manage settings button.![]()
8. Select Create New Settings.![]()
9. Enter the desired name.
10. Click Next.![]()
11. Go to the Steam Workshop tab.![]()
12. Add the desired mods from Step 4.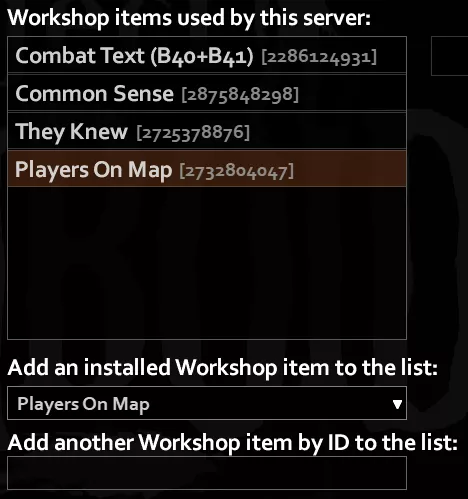
13. Press the Save button.![]()
14. Go to the local directory listed on the Server Settings.![]()
15. Open the .ini file with the matching name from Step 9.![]()
16. On the Mods= line, copy the listed mods.![]()
17. On the WorkshopItems= line, copy the listed IDs.![]()
18. Log in to the BisectHosting Games panel.
19. Stop the server.![]()
20. Go to the Files tab.![]()
21. Find the following directory: /home/container/.cache/Server .![]()
22. Open the ProjectZomboidServer.ini file. The .ini file is labeled depending on the Save/Config Name on the Startup tab.![]()
23. Next to the Mods= line, paste the list from Step 16.![]()
24. Next to the WorkshopItems= line, paste the IDs from Step 17.![]()
25. Press the Save Content button.
26. Start the server.![]()
How to Install Mods on Project Zomboid (Client Side)
1. From the Steam library, choose Project Zomboid.
2. Select Workshop.![]()
3. Scroll down and choose the See all button. ![]()
4.Choose a mod and click the green + Subscribe button.![]()
5. From the Project Zomboid main menu, choose MODS. 
6. Each mod can be enabled or disabled from this menu. It can also be changed per save file or even added to an existing save file. 
How to Install Mods on Project Zomboid (Server Side)
1. From the Steam library, choose Project Zomboid.
2. Select Workshop.![]()
3. Scroll down and choose the See all button.![]()
4. Choose a mod and jot down the Workshop ID as well as the Mod ID.![]()
5. Log in to the BisectHosting Games panel.
6. Stop the server.![]()
7. Choose Files.![]()
8. Go to the following directory: /home/container/.cache/Server .![]()
.ini file is labeled depending on the Save/Config Name on the Startup tab.![]()
10. Next to Mods=, input the Mod ID from step 4. Separate each Mod ID with a semicolon. 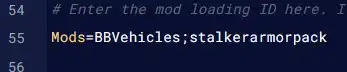
11. Next to WorkshopItems=, input the Workshop ID from step 4. Separate each Workshop ID with a semicolon. 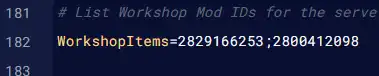
12. Press Save Content button.
13. Start the server. ![]()
How to Fix the Mod Anti-Cheat Error on a Project Zomboid Server
1. Log in to the BisectHosting Games panel.
2. Stop the server.![]()
3. Go to the Files tab.![]()
4. Find the following directory: /home/container/.cache/Server .![]()
5. Open the ProjectZomboidServer.ini file. The .ini file is labeled depending on the Save/Config Name on the Startup tab.![]()
6. Navigate to the Disables anti-cheat protection for type 12 line.![]()
7. On the AntiCheatProtectionType12= line, change the value to false.![]()
8. Press the Save Content button.
9. Start the server.![]()

