Summary
Enabling experimental features on a Minecraft Bedrock server allows server administrators and players to explore and test upcoming features, enhancements, and modifications before their official release. This option provides a valuable opportunity to preview new functionalities, offer feedback, and contribute to the development process. However, it is essential to use this feature with caution as experimental elements may still contain unresolved issues or bugs that could potentially affect the gameplay experience.
| Note | Enabling experimental features turns off achievements. Experiments can be unstable and may cause world corruption, lag, or server faults. Use with caution. |
How to Enable Experimental Mode on a Minecraft Bedrock Server
1. Launch Minecraft Bedrock.
2. Hit Play.![]()
3. Select and confirm the Create new world button.![]()
4. Go to the Experiments tab.![]()
5. Toggle on the desired experimental features.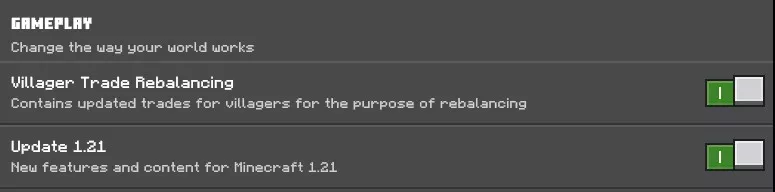
6. When asked Are you sure?, click Turn on Experiments anyway.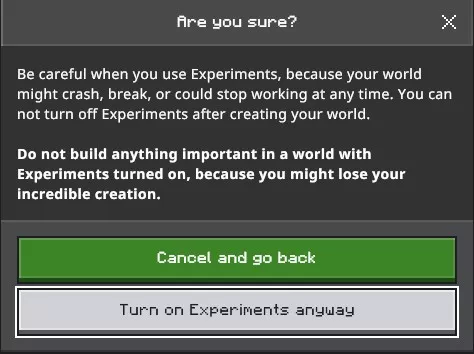
7. Hit Create.![]()
8. Once the world generates, hit the Esc key and click Save & Quit. ![]()
9. Select Edit from the created world.
10. On the General tab, scroll to the bottom and click Export World.![]()
11. Export the world to a folder.![]()
12. Minimize the folder to use later in the tutorial.
13. Log in to the BisectHosting Starbase panel.
14. Stop the server.![]()
15. Log in to the Minecraft Bedrock server using an SFTP client. Learn how to use SFTP here.
16. Open the worlds folder.![]()
17. Right-click and choose New Directory (or folder).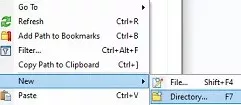
18. Input the world name and hit OK.
19. Drag and drop the .MCWORLD file from step 12 into the new folder.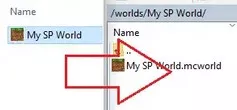
20. Return to the BisectHosting Starbase panel.
21. Go to the Files tab.![]()
22. Find the following directory: /home/container/worlds/[World Name] .![]()
23. Right-click the .MCWORLD file and select Unarchive.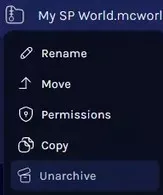
24. From the Config Files tab, choose Server Properties.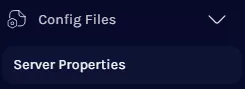
25. On the Level Name field, change the value to the world name.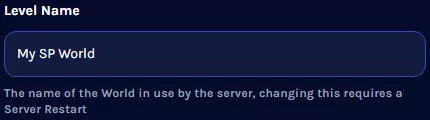
26. Start the server.![]()

