
Summary
Configuring an SFTP client for a Minecraft server allows for safe and efficient file management. It ensures that server files are transferred and edited without exposing sensitive data to potential security threats. It streamlines uploading custom mods, plugins, and backups, enhancing the server's functionality and user experience. Additionally, it provides a reliable way to manage server configurations and updates, facilitating smoother server maintenance and operations.
| Note | We recommend the following SFTP Clients based on the operating system: WinSCP - Windows Users Cyberduck - MacOS Users |
What is the Purpose of Using an SFTP Client?
An SFTP (Secure File Transfer Protocol) client provides a secure channel for file access, file transfer, and file management over a network. While the BisectHosting Games panel has a built-in file manager, any file bigger than 500MB must be transferred through an SFTP.
How to Configure an SFTP Client using WinSCP
1. Download and launch WinSCP.![]()
2. Choose New Session. If the login panel automatically appears, skip this step.![]()
3. Log in to the BisectHosting Starbase panel.
4. Go to the Files tab.![]()
5. Select SFTP Credentials from the top-right.![]()
6. Copy the required credentials to WinSCP.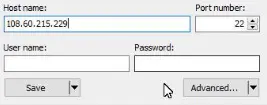
7. Click Login.![]()
8. The client can now access all server files, which can be dragged and dropped to upload/download files.
How to Configure an SFTP Client using Cyberduck
1. Download and launch Cyberduck.![]()
2. Choose Open Connection.![]()
3. Open the dropdown menu and select SFTP (SSH File Transfer Protocol).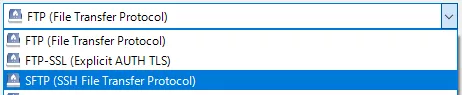
4. Log in to the BisectHosting Starbase panel.
5. Go to the Files tab.![]()
6. Select SFTP Credentials from the top-right.![]()
7. Copy the credentials into fields on Cyberduck. Ensure that the Port is separated from the Hostname.![]()
8. Click Connect.![]()
9. The client can now access all server files, which can be dragged and dropped to upload/download files.![]()

