Summary
BisectHosting's Instance Manager is a powerful tool for Minecraft servers, allowing users to create multiple independent server instances. This feature enables server owners to effortlessly switch between different Minecraft versions, modpacks, or saved worlds with just a click while keeping each instance's files and data completely intact. Whether creating a new instance based on a backup, updating an existing instance to a newer version, or performing a clean installation after deleting all previous files, the Instance Manager offers unparalleled flexibility and control for managing Minecraft servers.
How to Use the Instance Manager on a Minecraft Server
1. Log in to the BisectHosting Starbase panel.
2. Stop the server.![]()
3. Under the Minecraft Tools tab, select Minecraft Jar.
4. Install the desired Minecraft JAR.
5. Choose what to do with the current instance. For this guide, Save and Create New Instance will be used.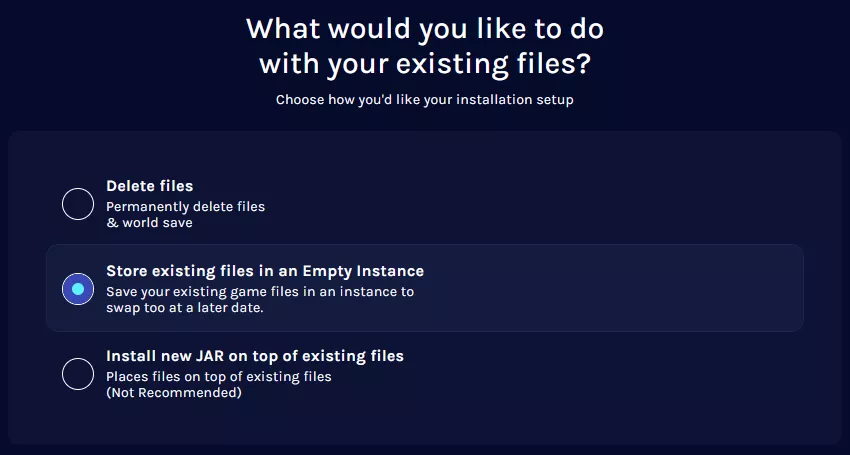
- Store existing files in an Empty Instance: Moves all current files into a new slot, creating a backup. It then generates a completely new instance using the new JAR files selected. Highly recommended when starting fresh while preserving the old setup.
- Install new JAR on top of existing files: Retains existing world progress and files. It updates the currently installed JAR and other necessary files to the new version chosen. This is ideal for updating the game without losing any progress.
- Delete Files: Removes all current files, including the world and settings. It then performs a fresh installation of the new JAR selected. Choose this to start over with a completely clean installation.
6. Enter a name for the new instance.
7. Select whether to save the Startup Variable on the current instance and click Next.
8. Choose Confirm.
9. Wait for the installation to finish. 
10. Start the server.![]()
11. To change the current instance, go to the Home tab. 
12. Switch to the desired instance by selecting Switch.
13. Hit Confirm.
14. Stop the server.![]()
15. Start the server.![]()

