Summary
The Darkness Falls mod for 7 Days to Die is a popular mod that completely overhauls the game, adding new features, mechanics, and challenges for players. It introduces new enemies, such as demonic creatures and supernatural beings, and makes existing enemies much more difficult to defeat. The mod also introduces new skills, perks, and crafting recipes, allowing players to create more powerful weapons, armor, and tools to survive in the harsh world of the game.
| Requirements |
| The 7D2D 9GB/PACKAGE 3 plan is required for Darkness Falls to run correctly. An FTP client is required to transfer files onto the 7 Days to Die server. Follow this tutorial to learn how to use an FTP client. |
| Note | The latest versions of Darkness Falls can now be installed through the Games panel. Learn how to install via the Mods tab here. |
| Note | Easy Anti Cheat is not compatible with Darkness Falls. Learn how to disable it here. |
| Note | Resetting the server is recommended before installing Darkness Falls to ensure compatibility. |
How to Install the Darkness Falls Overhaul Mod on a 7 Days to Die Server
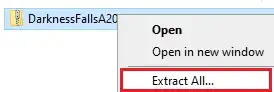
1. Download the Darkness Falls server files here. It must match the server version.
2. Extract the .zip file to a folder.
3. Minimize the folder to use later in the tutorial.
4. Log in to the BisectHosting Games panel.
5. Stop the server. 
6. Log in to the 7 Days to Die server using an FTP client.
7. Right-click on the server side root and choose New Directory (or folder).
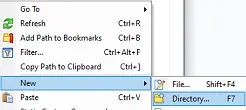
8. Name the directory Mods. The M in Mods must be capitalized.

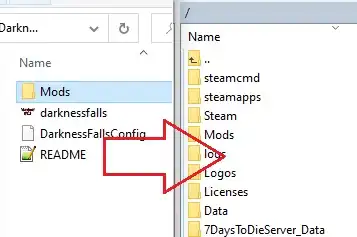
9. Drag and drop the Mods folder from step 3.
10. Return to the BisectHosting Games panel.
11. Go to the Files tab. 
12. Open serverconfig.xml for editing. 
13. On the <property name="GameWorld" line, change the value to DFalls-Navezgane. 
14. Press the Save Content button.
15. Start the server. 
How to Change the Map on a Darkness Falls 7 Days to Die Server
1. Log in to the BisectHosting Games panel.
2. Stop the server.
3. Go to the Files tab.
4. Open serverconfig.xml for editing.
5. On the <property name="GameWorld" line, change the value to a map name from the list below:
DFalls-Large1-NoPEP DFalls-Large2-NoPEP DFalls-Medium1-NoPEP DFalls-Medium2-NoPEP DFalls-Naveszgane DFalls-Small1-NoPEP DFalls-Small1-NoPEP DFalls-VSmall1-NoPEP DFalls-VSmall2-NoPEP
6. On the <property name="GameName" line, change the value to a preferred save name. 
7. Press the Save Content button.
8. Start the server.