
Summary
V Rising is an open-world survival game developed by Stunlock Studios. In V Rising, players take on the role of a fledgling vampire and must overcome many challenges to grow in strength. Players can also encounter other vampires in multiplayer during their journeys, making in-game voice chat an essential component of the game's immersion.
How to Set up Voice Chat on a V Rising Server
1. Sign in or create an account for the Unity Dashboard.
2. Next to the Projects section on the dashboard, press the +New button.
3. Enter any name and confirm to Create a Project.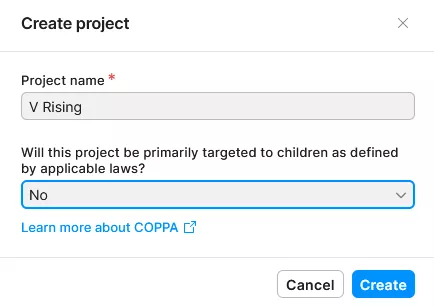
4. After creating the project, press the Plus Sign in the shortcuts section of the left sidebar.
5. Search for and select Vivox.
6. With Unity selected, press Next.

7. Skip this step by pressing Next.
8. Skip this step as well, and choose Finish.![]()
9. Go to the Credentials page under Voice and Text Chat. Keep this page open for use later in the tutorial.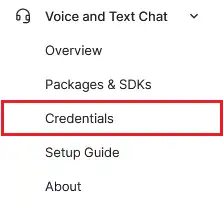
10. Log in to the BisectHosting Games panel.
11. Go to the Files tab.
12. Find the following directory: home/container/save-data/Settings . 

14. Enter the data below into the file.{
"VOIPEnabled": true,
"VOIPIssuer": "",
"VOIPSecret": "",
"VOIPVivoxDomain": "",
"VOIPAPIEndpoint": "https://unity.vivox.com/appconfig/",
"VOIPAppUserId": "",
"VOIPAppUserPwd": "",
"VOIPConversationalDistance": 14,
"VOIPAudibleDistance": 40,
"VOIPFadeIntensity": 2.0
}
15. In the quotes next to VOIPIssuer , input the info next to Token Issuer on the unity dashboard.![]()
![]()
16. For VOIPSecret , input the info next to Token Key on the unity dashboard.![]()
![]()
17. For VOIPVivoxDomain , input the info next to Domain on the unity dashboard.![]()
![]()
18. At the end of the link inside of VOIPAPIEndpoint , input the same info as VOIPIssuer.![]()
![]()
| Note | WARNING: Do not adjust VOIPAppUserId or VOIPAppUserPwd . The distance settings can be adjusted freely. |
19. Save the file as ServerVoipSettings.json .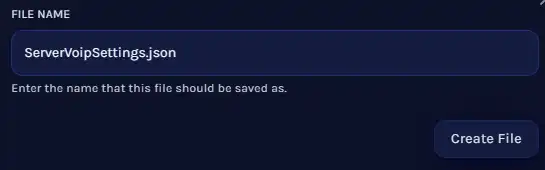
20. Start the server.
21. VoIP will now be enabled on the server. To use VoIP, ensure that Voice Chat is enabled in the sound settings.![]()

