
RuneScape: Dragonwilds Scorned Wilderness Raid Guide: Items to Bring, Fight Tips, Puzzle Walkthroughs, & More
Posted on by

Share:

Share on X

Share on Facebook

Share on Threads

Share on Bluesky

Copy to Clipboard

Share via email
The Scorned Wilderness raid in RuneScape: Dragonwilds is an endgame challenge and the end of Kuldra’s Saga, if you manage to complete it. This raid tests the combat, puzzle-solving, and platforming skills you’ve learned throughout the game. This guide helps you prepare, survive, and win each phase of this arduous challenge so you can conquer the ultimate fight of RuneScape: Dragonwilds 1.0, so let's get into it!
 Before you can attempt the Scorned Wilderness raid in RuneScape: Dragonwilds 1.0, you must progress through the game’s main narrative. This grueling endgame dungeon is locked behind the Regicide quest, which serves as the final chapter of Kuldra’s Saga.
Note that completing Icthlarin’s Little Helper quest is a requirement to unlock the Regicide mission. The path to the Scorned Wilderness raid will only open after fulfilling all objectives of that quest.
Before you can attempt the Scorned Wilderness raid in RuneScape: Dragonwilds 1.0, you must progress through the game’s main narrative. This grueling endgame dungeon is locked behind the Regicide quest, which serves as the final chapter of Kuldra’s Saga.
Note that completing Icthlarin’s Little Helper quest is a requirement to unlock the Regicide mission. The path to the Scorned Wilderness raid will only open after fulfilling all objectives of that quest.
 Note: Image courtesy of SuperStooob.
First, prepare carefully, as inventory management becomes a challenge in itself in the Scorned Wilderness raid. Bring Antipoison and Antifire potions, along with health restoration items and repair materials. Don’t forget to bring at least an Adamant Pickaxe for gathering ore from Runite and Luminite deposits.
Upon entering, it’s tough to miss how different this realm is from the rest of Ashenfall. It’s built around floating islands fractured by unstable Anima energy, so platforming becomes just as important as combat. Timing and distance become integral to moving across gaps and pathways, as well as to solving environmental puzzles.
The Scorned Wilderness raid is also a massive structure with checkpoints and extraction points. These specific locations allow players to save progress and return later without having to repeat every completed section.
Additionally, building is disabled in the raid, except for the first section called Rasthin’s Rest. So, any preparation must be completed in its staging hub before crossing into the main encounter zones.
Note: Image courtesy of SuperStooob.
First, prepare carefully, as inventory management becomes a challenge in itself in the Scorned Wilderness raid. Bring Antipoison and Antifire potions, along with health restoration items and repair materials. Don’t forget to bring at least an Adamant Pickaxe for gathering ore from Runite and Luminite deposits.
Upon entering, it’s tough to miss how different this realm is from the rest of Ashenfall. It’s built around floating islands fractured by unstable Anima energy, so platforming becomes just as important as combat. Timing and distance become integral to moving across gaps and pathways, as well as to solving environmental puzzles.
The Scorned Wilderness raid is also a massive structure with checkpoints and extraction points. These specific locations allow players to save progress and return later without having to repeat every completed section.
Additionally, building is disabled in the raid, except for the first section called Rasthin’s Rest. So, any preparation must be completed in its staging hub before crossing into the main encounter zones.
How to Unlock the Scorned Wilderness Raid in RuneScape: Dragonwilds
Before you can attempt the Scorned Wilderness raid in RuneScape: Dragonwilds 1.0, you must progress through the game’s main narrative. This grueling endgame dungeon is locked behind the Regicide quest, which serves as the final chapter of Kuldra’s Saga.
Note that completing Icthlarin’s Little Helper quest is a requirement to unlock the Regicide mission. The path to the Scorned Wilderness raid will only open after fulfilling all objectives of that quest.
RuneScape: Dragonwilds Scorned Wilderness Raid: Step-by-Step Guide
Note: Image courtesy of SuperStooob.
First, prepare carefully, as inventory management becomes a challenge in itself in the Scorned Wilderness raid. Bring Antipoison and Antifire potions, along with health restoration items and repair materials. Don’t forget to bring at least an Adamant Pickaxe for gathering ore from Runite and Luminite deposits.
Upon entering, it’s tough to miss how different this realm is from the rest of Ashenfall. It’s built around floating islands fractured by unstable Anima energy, so platforming becomes just as important as combat. Timing and distance become integral to moving across gaps and pathways, as well as to solving environmental puzzles.
The Scorned Wilderness raid is also a massive structure with checkpoints and extraction points. These specific locations allow players to save progress and return later without having to repeat every completed section.
Additionally, building is disabled in the raid, except for the first section called Rasthin’s Rest. So, any preparation must be completed in its staging hub before crossing into the main encounter zones.
The Dragontail Vines
Exit Rasthin’s Rest to enter the Dragontail Vines. Here, the raid eases you into the domain’s core mechanics. Learn how to travel through dangerous floating islands covered in Dragontail Vines while battling fairly small enemy groups, and understand how Anima-powered traversal works. Although the enemies in this area aren’t the most dangerous, complacency can still lead to a quick death. If you’re doing the Scorned Wilderness raid as part of the Regicide quest, story elements will appear in different instances. For instance, heading down an Anima bridge triggers a short scene wherein Kuldra, the raid’s main boss, appears. Zilyana also enters the scene, and she’ll protect you from an incoming attack from the creature, as long as you follow her instructions.Fragments of Ghornfell
After following the relatively linear path of the Dragontail Vines, you’ll eventually reach the Fragments of Ghornfell. This area serves as one of the Scorned Wilderness raid’s first major difficulty spikes, as it combines intense combat encounters with environmental navigation. Unlike the Dragontail Vines, enemy density significantly increases in the Fragments of Ghornfell. Ready your swords, bows, and spells, as stronger foes are lying in wait in different locations. The area’s fragmented terrain can also separate players, making communication essential for those in co-op RuneScape: Dragonwilds servers. Eventually, you’ll run into an Abyssal Demon. Defeat it, and you should have access to another extraction point. Activate it, and unlock the next part of the Scorned Wilderness raid.The Shattered Stronghold
If you thought the Fragments of Ghornfell were challenging, then the Shattered Stronghold can give you a run for your money. This area emphasizes sustained combat and careful resource management. Elite foes appear more frequently than in previous areas of the raid, and enemy waves become more coordinated. Since you’ll be encountering multiple groups of enemies, your success in the Shattered Stronghold typically lies in your gear’s durability. The Magical Mending spell is a must-have for this area to partially repair your equipment. Otherwise, carry backup weapons whenever possible. Like the other regions of the Scorned Wilderness, defeating a particularly tough enemy grants you access to an extraction point. For the Shattered Stronghold, that foe is a black dragon. Defeat it, and get ready to enter the next location.Cataclysm Keep
Platforming becomes more important than combat in the Cataclysm Keep. This area is more fractured than the rest of the raid’s locations, making it crucial to space your jumps accordingly. Soon enough, you’ll reach the Four-Pylon Puzzle. The solution to this challenge is to press the buttons in the following order: Air, Water, Earth, and, finally, Fire. Pressing the buttons in the right order opens a path to a flight of stairs. Climb it to reach a teleporter. Then, proceed when you’re ready, as you’re about to fight Kuldra, the boss of the Scorned Wilderness raid.Defeat Kuldra, the God Eater
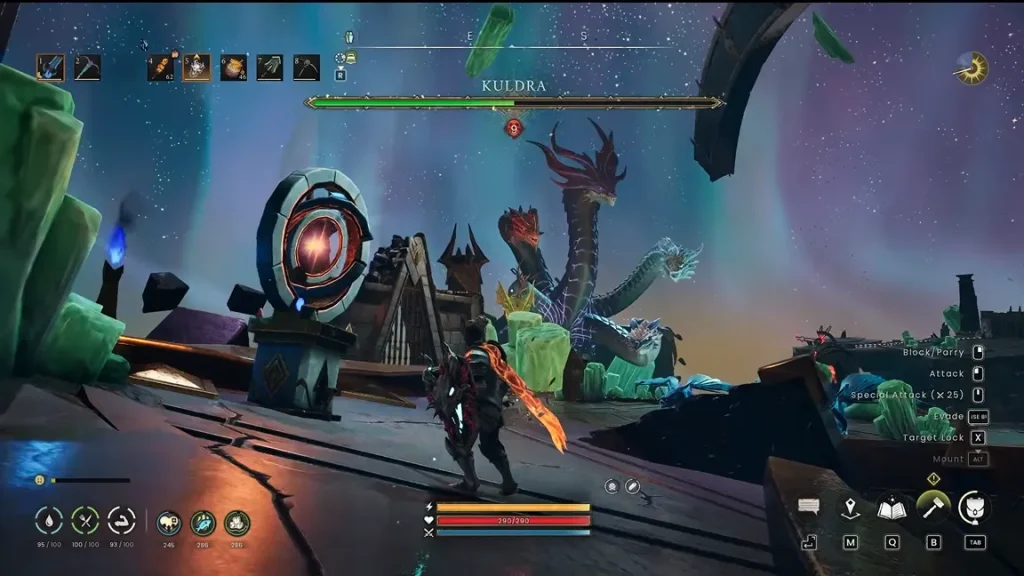
Kuldra, also known as Queen Kuldra, the Dragon Queen, and the God Eater, is a five-headed dragon and the leader of her kin. This climactic boss encounter serves as the conclusion of the Regicide quest and the ultimate test of everything you’ve learned throughout this raid. Unlike previous bosses, you won’t spend most of the fight hacking and slashing at Kuldra’s body directly. Instead, this battle revolves around powering the Harmonic Resonator and activating elemental pylons while surviving her devastating attacks. Arguably, her most devastating attack is a Hyper Beam, a massive energy blast capable of one-shotting unprepared players. Thankfully, the buildup to this attack is quite obvious, allowing you to move behind one of the large green crystals throughout the arena. These structures block the beam entirely, allowing you to survive the attack unscathed. Kuldra also unleashes elemental attacks based on fire, poison, lightning, and ice. Like her Hyper Beam, these attacks are usually telegraphed with visible indicators on the ground. Players must stay alert while watching the ground for visual cues. Avoid standing in one place for extended periods, or death comes sooner rather than later. During the first three phases of this fight, your objective is to defeat elemental dragons, gather their Anima, activate the correct pylons, and fire the Harmonic Resonator at Kuldra. Then, at specific health thresholds, Zilyana creates a protective barrier around the arena. Move inside the shield immediately, as Kuldra will follow up with devastating arena-wide attacks. The final phase of this battle takes place in Kuldra’s body, where you’ll come face-to-face with her heart. This entity constantly creates poison zones and summons Heartworms. One way to cheese this part of the battle is to stay in the throat or entryway and fire ranged attacks at the heart. Otherwise, eliminate the Heartworms first, and then go for the heart. In the end, Kuldra falls, slain by your hands. This victory comes with rewards, as you’re guaranteed to receive the following loot: Kuldra’s Head, Lougrim’s Staff, and Ascension Shard (Power Level 8).Create your own
Runescape: Dragonwilds server
Runescape: Dragonwilds server
Choose a plan, pick a game, and play with your friends!
Join our Newsletter
Subscribe for the latest updates on all things gaming!

How would you rate this blog?
Share your opinion and help us make our blogs even better!
Didn't like
Neutral
Liked

Need a game server?
Rent a game server where you and your friends can play privately with low latency and custom settings. Choose from 110+ games, invite people from around the globe, and enjoy private matches, or build your own online community with your own rules.

Relevant Blogs






GET THE INSIDE SCOOP!
Join our email for updates on our hosted games, company news and exclusive deals. Stay in the loop!