No One Survived Server Guide
Publicado el por
Compartir:
Compartir en X
Compartir en Facebook
Compartir en Threads
Compartir en Bluesky
Copiar al portapapeles
Compartir por correo electrónico
(Estimated Read Time: 5 minutes)
Creating and joining a server in No One Survived can be somewhat confusing. We’re here to help you with these concerns. So here, we'll cover how to create and join a dedicated server in No One Survived.Creating a Dedicated Server in No One Survived
 Unlike games like The Front, creating a dedicated server in No One Survived isn’t a straightforward procedure. Instead, interested individuals must use a separate app to help them create dedicated servers.
You’ll find the step-by-step process for creating a No One Survived dedicated server below, including the methods required to use the aforementioned app:
Unlike games like The Front, creating a dedicated server in No One Survived isn’t a straightforward procedure. Instead, interested individuals must use a separate app to help them create dedicated servers.
You’ll find the step-by-step process for creating a No One Survived dedicated server below, including the methods required to use the aforementioned app:
- Create a new folder on your PC and name it “SteamCMD” without the quotes
- Download SteamCMD here and install it in the newly created folder from the previous step
- Open the SteamCMD folder with the extracted files
- Create a new folder in the SteamCMD folder and name it “NoOneSurvivedServer” without the quotes
- Open the SteamCMD app and enter the following command: force_install_dir ./NoOneSurvivedServer/
- Log into your Steam account from SteamCMD
- Once logged in, enter the following command: app_update 2329680
- Wait for the operation to complete, and then enter “quit” without the quotes to log out of SteamCMD
- Open the NoOneSurvivedServer folder and create a shortcut for WRSHServer.exe
- Right-click on the WRSHServer.exe shortcut, and click Properties from the context menu
- Add the parameter “-server -log” without the quotes to the target field
- Run the WRSHServer.exe from its shortcut and wait until “ServerCreate” is displayed on the window
[ServerSetting]
- SaveName: The archive’s name.
- ServerName: Name of the server.
- NeedPassword: Indicate “True” if the server requires a password or “False” if otherwise.
- Password: The password required to access the dedicated server.
- NumOfZombie Spawn: Indicates the number of undead generated by the wave of corpse tide. Only accepts whole numbers ranging from 25 to 100.
- Region: Indicates the server’s region (All=non-registered region, AF=Africa, AS=Asia, EU=Europe, NA=North America, OC=Oceana, and SA=South America).
- AdminPassword: The server administrator’s password.
[GameSettings]
- ZombieAttack: Indicate “True” to start the corpse tide or “False” if otherwise.
- Zombie Attack Day: Indicates the Corpse Tide Attack Day. Only accepts whole numbers ranging from 1 to 30.
- Attack ZombieNum: Indicates the scale of attack corpse tide. Only accepts whole numbers ranging from 1 to 5.
- ZombieNum: Indicates the map’s lost generation. Only accepts whole numbers ranging from 1 to 3.
- RunZombiePercent: Indicates the percentage of running zombies. Accepts numbers ranging from 0.0 to 1.0.
- ZombieStreng: Adjusts the strength of zombies. Only accepts whole numbers ranging from 0 to 3.
- YearDay: Indicates the current in-game day of the year. Accepts whole numbers.
- PermanentDead: Indicate “True” to turn on permadeath or “False” if otherwise.
- MaterialNum: Indicates the number of spawning materials. Only accepts whole numbers ranging from 0 to 3.
- ItemSpawn: Indicates the material refresh rate. Accepts whole numbers.
- VirusFatalyRate: Indicates the virus fatality rate. Accepts numbers ranging from 0.0 to 1.0.
- NPCItemSpawn: Indicates the NPC merchant item refresh rate. Accepts whole numbers.
- PVP: Indicate “True” to enable PVP in the dedicated server or “False” if PVE only.
Connecting to a Dedicated Server
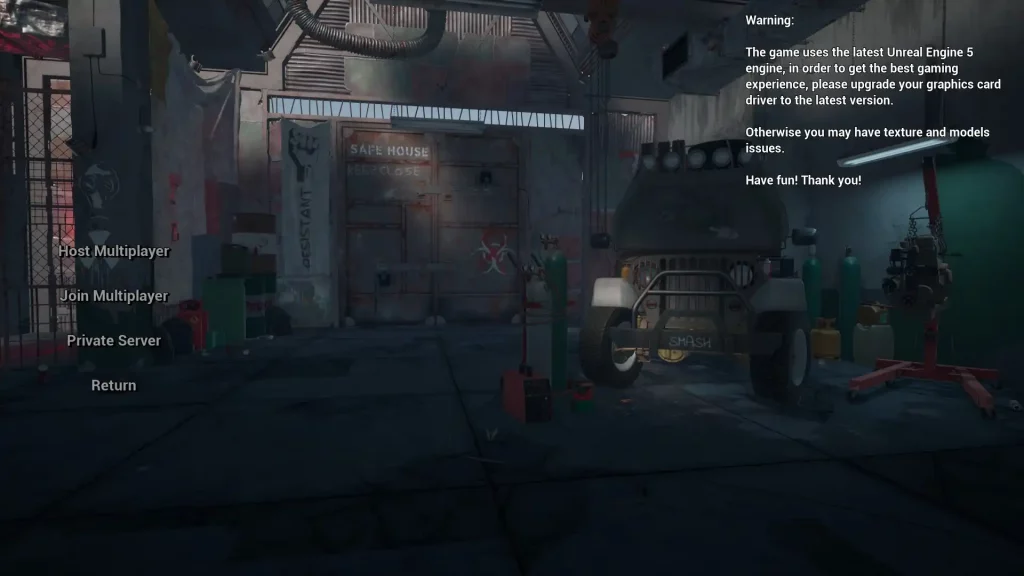
Now that your dedicated server for No One Survived is up and running, you can now share its details with fellow players. Here’s how to connect to the newly created dedicated server:- Launch No One Survived normally
- Select “Multiplayer” from the main menu
- Click “Private Server,” and search for the server’s name indicated in the ServerName field in the Game.ini file
- Select the dedicated server’s name and click “Join In”
Need Help?
Do you still find creating a dedicated server for No One Survived confusing or frustrating? Let us help you! Contact us today, and our dedicated customer support representatives will help you set everything up via our 24/7 live chat!Crea tu propio
servidor de No One Survived
servidor de No One Survived
¡Elige un plan, escoge un juego y juega con tus amigos!
Suscríbete a nuestro boletín
¡Suscríbete para recibir las últimas novedades sobre todo lo relacionado con videojuegos!
Únete a nuestro Discord
¡Forma parte de nuestra comunidad de más de 20 000 miembros con los mismos intereses!
¿Cómo calificarías este blog?
¡Comparte tu opinión y ayúdanos a mejorar aún más nuestros blogs!
No me gustó
Neutral
Me gustó

¿Necesitas un servidor de juegos?
Alquila un servidor de juego donde tú y tus amigos podáis jugar en privado con baja latencia y ajustes personalizados. Elige entre 100+ juegos, invita a gente de todo el mundo y disfruta de partidas privadas, o crea tu propia comunidad en línea con tus propias reglas.

Blogs relevantes


¡ENTÉRATE DE TODO!
Suscríbete a nuestro boletín para recibir las novedades sobre nuestros juegos alojados, noticias de la empresa y ofertas exclusivas. ¡Mantente al tanto de todo!