Minecraft Seed Map Guide: How to Use, Settings, & More
Veröffentlicht am von

Teilen:

Auf X teilen

Auf Facebook teilen

Auf Threads teilen

Auf Bluesky teilen

In die Zwischenablage kopieren

Per E-Mail teilen
Seed maps are one of the most useful tools for finding what a world hides, but since they are third-party, it is understandable to be hesitant or have some confusion when seeing one for the first time. So, today, we explore how to use a Minecraft Seed Map alongside the settings in our Minecraft seed map guide.
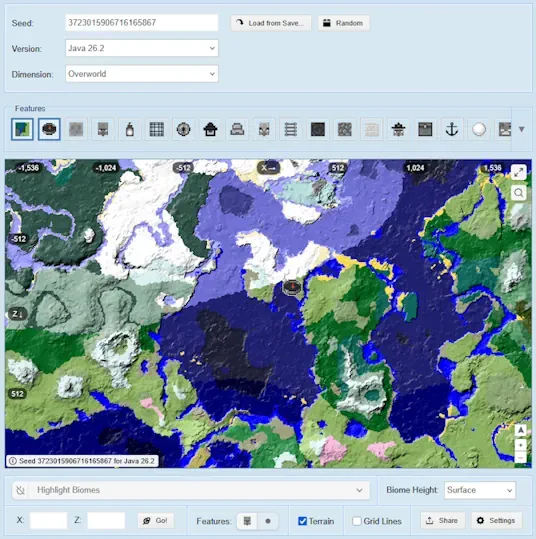 Confined and concise, ChunkBase’s Seed Map can be divided into four sections: Seed, Feature Filter, Map, and Biome Filter. Below, we explore each one and detail step by step how to make full use of what these nifty sections offer.
 Before the map can be used, a seed must be entered into the text box. By default, it will have a random seed that can be erased and replaced with a custom one. Alternatively, the “Random” button can be used for a new random seed, or the “Load from Save” button can be used to upload a level.dat file from within an existing world folder. World folders on Windows Java Edition are saved within the following directory:
 The features section allows users to select what world features they would like to have icons for on their map, such as villages or lava pools. All selected features are indicated by color and a blue border. In the image above, for example, we have spawn on the map indicated by the compass icon. The name that each image represents can be viewed by clicking the drop-down arrow to expand the feature menu.
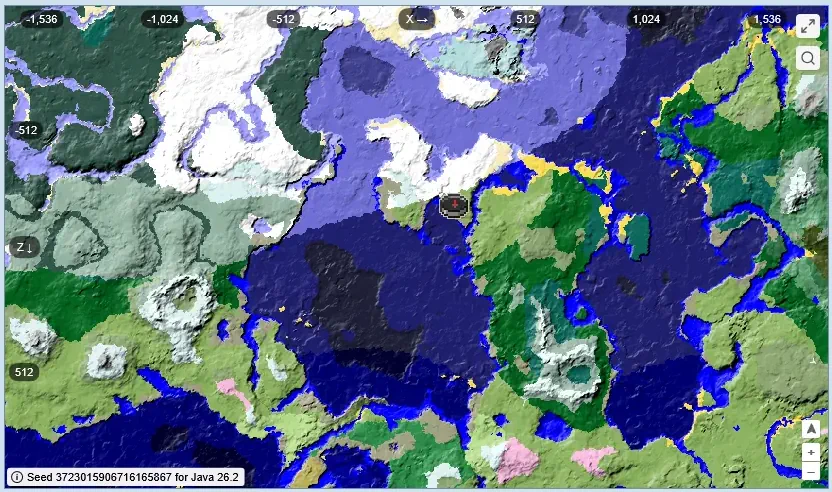 The map can be moved with mouse button one, marked with mouse button two, and zoomed in and out with the scroll wheel. Those on mobile can similarly control the map by dragging it, pinching to zoom in and out, and pressing and holding to leave a marker. While doing so, shifting numbers along the top and left of the screen adjust to represent the X and Z coordinates that would similarly be found in game. Spawn, by default, can be found around 0,0.
 Finally, the biome filter can be used to highlight specific biomes on the map. This is done by selecting the “Highlight Biomes” drop-down menu and clicking any number of biomes inside. For underground biomes, it is important to note that they will only be visible if the “Biome Height” drop-down menu is set to underground. While not related to the biome filter, a tool for jumping to exact coordinates can be found right beneath it too. This is very convenient for returning to spawn by entering 0 for both and clicking “Go.”
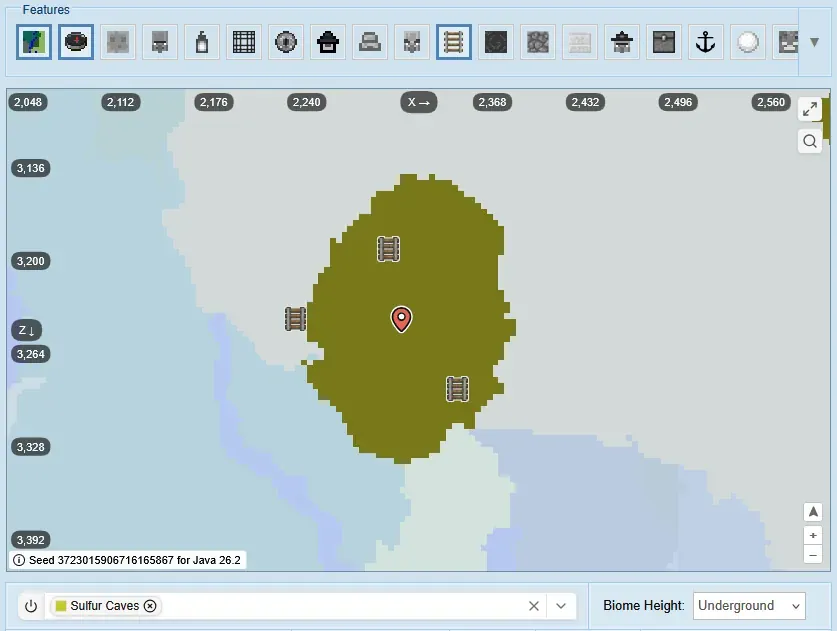 Putting what was discussed to use, we can try finding a rare biome and structure combination. So, let’s dive in! A mineshaft within a sulfur caves biome is the only place in the entire game where the “Bounce” music disc can be found as loot within chests. This makes it very hard to find intentionally. That is, if you don’t have a seed map!
First, enter or load your world’s seed with the correct version before heading to the feature filter and deselecting everything but “Biomes” and “Mineshaft.” After that, head down to the biome filter and select “Sulfur Caves” and ensure “Biome Height” is set to “Underground.”
With those settings applied, drag the map until a sulfur caves biome with mineshaft icons on it is located. The coordinates can then be noted using a marker before heading there in-game to get “Bounce” at record speed.
Putting what was discussed to use, we can try finding a rare biome and structure combination. So, let’s dive in! A mineshaft within a sulfur caves biome is the only place in the entire game where the “Bounce” music disc can be found as loot within chests. This makes it very hard to find intentionally. That is, if you don’t have a seed map!
First, enter or load your world’s seed with the correct version before heading to the feature filter and deselecting everything but “Biomes” and “Mineshaft.” After that, head down to the biome filter and select “Sulfur Caves” and ensure “Biome Height” is set to “Underground.”
With those settings applied, drag the map until a sulfur caves biome with mineshaft icons on it is located. The coordinates can then be noted using a marker before heading there in-game to get “Bounce” at record speed.
Finding Your Preferred Seed Map
There are many options for seed maps, with two of the more popular options being ChunkBase’s Seed Map and MC Seed Map. ChunkBase’s Seed Map offers a very user-friendly interface with the commonly used filters and settings visibly displayed directly around the map. This makes it a great option for those jumping into seed maps for the first time, but it does have video ads. The other popular option, MC Seed Map, divides its filters and settings among five tabs just below the map. This can be a little confusing at first, but all the commonly used filters and settings are preset alongside a few others that allow for a more refined search, such as defining the Y level. MC Seed Map also has fewer ads. Ultimately, there is no wrong option between the two. It mostly comes down to preference. But since ChunkBase’s Seed Map tends to be the one encountered by users first, we will be proceeding with that map for this particular guide.ChunkBase
Confined and concise, ChunkBase’s Seed Map can be divided into four sections: Seed, Feature Filter, Map, and Biome Filter. Below, we explore each one and detail step by step how to make full use of what these nifty sections offer.
Entering a Seed
Before the map can be used, a seed must be entered into the text box. By default, it will have a random seed that can be erased and replaced with a custom one. Alternatively, the “Random” button can be used for a new random seed, or the “Load from Save” button can be used to upload a level.dat file from within an existing world folder. World folders on Windows Java Edition are saved within the following directory:
- %appdata%\.minecraft\saves
Filtering Features
The features section allows users to select what world features they would like to have icons for on their map, such as villages or lava pools. All selected features are indicated by color and a blue border. In the image above, for example, we have spawn on the map indicated by the compass icon. The name that each image represents can be viewed by clicking the drop-down arrow to expand the feature menu.
Controlling the Map
The map can be moved with mouse button one, marked with mouse button two, and zoomed in and out with the scroll wheel. Those on mobile can similarly control the map by dragging it, pinching to zoom in and out, and pressing and holding to leave a marker. While doing so, shifting numbers along the top and left of the screen adjust to represent the X and Z coordinates that would similarly be found in game. Spawn, by default, can be found around 0,0.
Filtering Biomes
Finally, the biome filter can be used to highlight specific biomes on the map. This is done by selecting the “Highlight Biomes” drop-down menu and clicking any number of biomes inside. For underground biomes, it is important to note that they will only be visible if the “Biome Height” drop-down menu is set to underground. While not related to the biome filter, a tool for jumping to exact coordinates can be found right beneath it too. This is very convenient for returning to spawn by entering 0 for both and clicking “Go.”
Finding a Sulfur Mineshaft
Putting what was discussed to use, we can try finding a rare biome and structure combination. So, let’s dive in! A mineshaft within a sulfur caves biome is the only place in the entire game where the “Bounce” music disc can be found as loot within chests. This makes it very hard to find intentionally. That is, if you don’t have a seed map!
First, enter or load your world’s seed with the correct version before heading to the feature filter and deselecting everything but “Biomes” and “Mineshaft.” After that, head down to the biome filter and select “Sulfur Caves” and ensure “Biome Height” is set to “Underground.”
With those settings applied, drag the map until a sulfur caves biome with mineshaft icons on it is located. The coordinates can then be noted using a marker before heading there in-game to get “Bounce” at record speed.Erstelle deinen eigenen
Minecraft-Server
Minecraft-Server
Wähle einen Tarif, such dir ein Spiel aus und spiele mit deinen Freunden!
Abonniere unseren Newsletter
Abonniere für die neuesten Updates rund ums Gaming!

Tritt unserem Discord bei
Werde Teil unserer Community von über 20.000 gleichgesinnten Mitgliedern!
Wie würdest du diesen Blog bewerten?
Teile deine Meinung und hilf uns, unsere Blogs noch besser zu machen!
Hat mir nicht gefallen
Neutral
Hat mir gefallen

Brauchst du einen Spielserver?
Miete einen Spielserver, auf dem du und deine Freunde privat mit niedriger Latenz und benutzerdefinierten Einstellungen spielen könnt. Wähle aus 110+ Spielen, lade Leute aus der ganzen Welt ein und genieße private Matches oder baue deine eigene Online-Community mit deinen eigenen Regeln auf.

Relevante Blogs


HOL DIR DIE INSIDER-INFOS!
Melde dich für unsere E-Mails an, um Updates zu unseren gehosteten Spielen, Unternehmensnachrichten und exklusiven Angeboten zu erhalten. Bleib auf dem Laufenden!