No One Survived Base Building Guide: Locations, Materials, & How to Build
发布于 ,作者

分享:

分享至 X

分享至 Facebook

分享至 Threads

分享至 Bluesky

复制到剪贴板

通过电子邮件分享
(Estimated Read Time: 9 minutes)
Developer Cat Play Games included an immersive building system in their post-apocalyptic zombie survival title, No One Survived. While this gives players room to make some extraordinary structures and bases, getting there can be a bit of a challenge, so we're here to help with a beginner's guide for building your base in No One Survived.No One Survived Base Building Basics
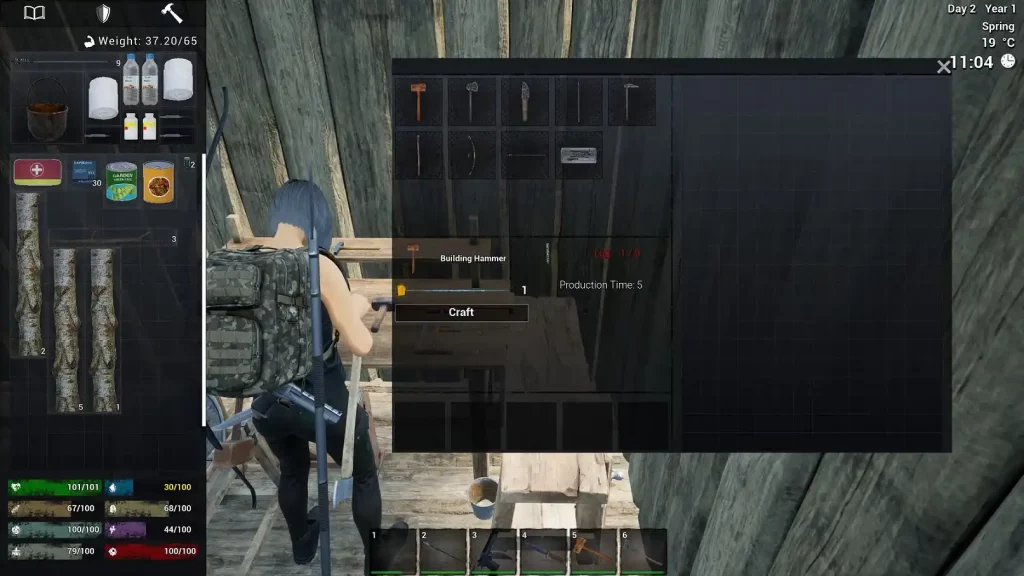 First, you must craft the Building Hammer from the Processing Table. You can unlock this crafting station from the Tech Tree with 1x Log and 3x Stone. If you opt for the Starter Kit when starting in No One Survived, you should have the hammer in your inventory once you spawn.
After crafting the Building Hammer, equip it and press the middle mouse button to bring up the build selection interface. Here, you’ll see five tabs: Structure, Roof, Synthesis, Furniture, and Outdoor.
Despite the five tabs, base building in No One Survived comes down to building three primary structures: foundations, walls, and roofs. Other items like stairs and campfires are generally optional but might be requirements in certain scenarios.
Thankfully, No One Survived doesn’t immediately spend your resources when you place the building item on the map, unlike other survival games like Smalland. Instead, the game lets you place blueprints, allowing you to plan your build before finalizing it.
After completing your planned build, walk to a specific blueprint and press “E” to add materials one at a time or “F” to add all the necessary resources to complete that section.
First, you must craft the Building Hammer from the Processing Table. You can unlock this crafting station from the Tech Tree with 1x Log and 3x Stone. If you opt for the Starter Kit when starting in No One Survived, you should have the hammer in your inventory once you spawn.
After crafting the Building Hammer, equip it and press the middle mouse button to bring up the build selection interface. Here, you’ll see five tabs: Structure, Roof, Synthesis, Furniture, and Outdoor.
Despite the five tabs, base building in No One Survived comes down to building three primary structures: foundations, walls, and roofs. Other items like stairs and campfires are generally optional but might be requirements in certain scenarios.
Thankfully, No One Survived doesn’t immediately spend your resources when you place the building item on the map, unlike other survival games like Smalland. Instead, the game lets you place blueprints, allowing you to plan your build before finalizing it.
After completing your planned build, walk to a specific blueprint and press “E” to add materials one at a time or “F” to add all the necessary resources to complete that section.
Best Base Locations
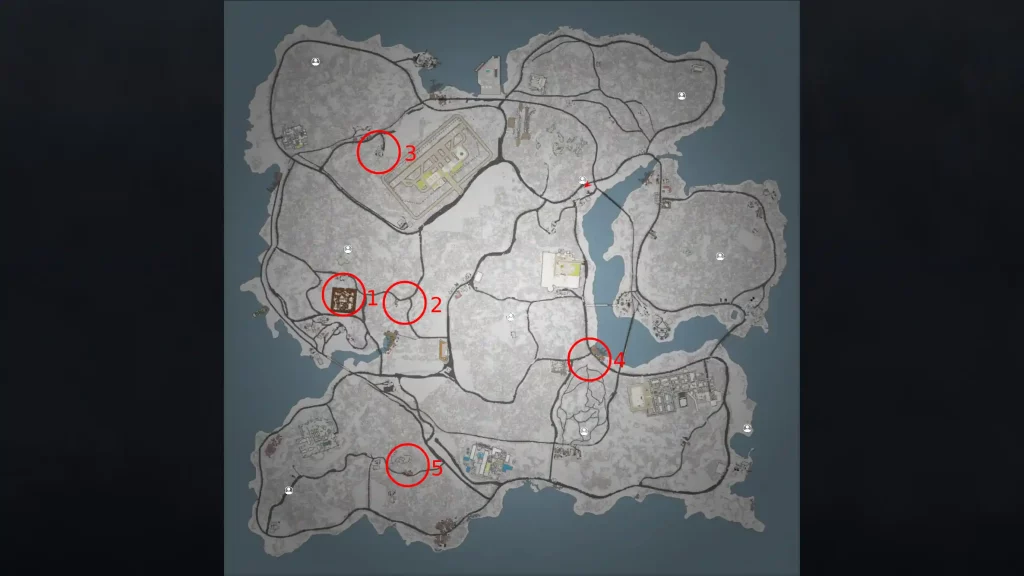 Generally, you can build a camp or base in many locations in No One Survived. However, not every place is ideal for a headquarters. On the other hand, some locations can be good or even great sites for camps or bases. Some notable examples include the following:
Location #1: Abandoned Farm No. 1 – West
Travel to the western border of No One Survived’s map to find an abandoned farm. Claim this area if no one did, and you can save a massive amount of resources from crafting building items. This location has pre-built rooms for your equipment and storage containers. Additionally, the general lay of the land is reasonably flat, allowing you to build additional structures when needed and without significant compromise. The abandoned farm is also near the iron and saltpeter mine. Also, a short trek up the hill next to the mine is Maria, an NPC trader.Location #2: Internet Café – West
While still on the western side of the map, travel slightly east to find an abandoned Internet café. Although this area is small, the various rooms sprawled across the vicinity can be great hideouts during the game’s early stages. Despite it being abandoned, the undead have taken over the area. There’s also a bear wandering around that can be dangerous if left alone. So, kill the zombies and the bear before claiming this location. Once the area is clear, you’re free to survey the site. Don’t forget to loot the containers in the rooms since the café has plenty of food items for the taking. Like the previous location, this Internet café is on a reasonably flat terrain. Its fairly small land area also means you don’t have to focus on multiple entry points that zombies or players might exploit to invade your territory.Location #3: Abandoned Farm No. 2 – Northwest
If you need extra space for your equipment and tech, the abandoned farm at the northwestern part of the map is a larger abandoned farm than the previous location. This time, this site is close to an airport and a gas station. Like the first abandoned farm, this location has a reasonably flat terrain. Additionally, various structures surround the flat terrain, ideal for traps and other tech to fend off attacking zombies and hostile players.Location #4: Hospital – Central
Near the center part of the map, and a little to the east, is an abandoned hospital. This prime location is near different resource-gathering spots. In particular, you can get water from the nearby river to prevent thirst. There’s also a clay mine close by. Additionally, the hospital is chock full of medical equipment, reducing your risks of getting sick or dying from illnesses when you claim this area. The hospital is also close to a small village, further increasing looting opportunities. However, the land surrounding the hospital isn’t as flat as the previous entries on this list. So, you may encounter some issues when adding structures to the area.Location #5: Forest Base – Southwest
Like the Internet café, the abandoned forest base’s area is quite small. But, again, its fairly tiny size allows players to focus on only a few entry points, enhancing defensive opportunities. The forest base is also close to the aluminum and coal mine. However, the site is surrounded by hills and trees, making building additional structures more challenging than in other locations.Sample Base Build for Beginners
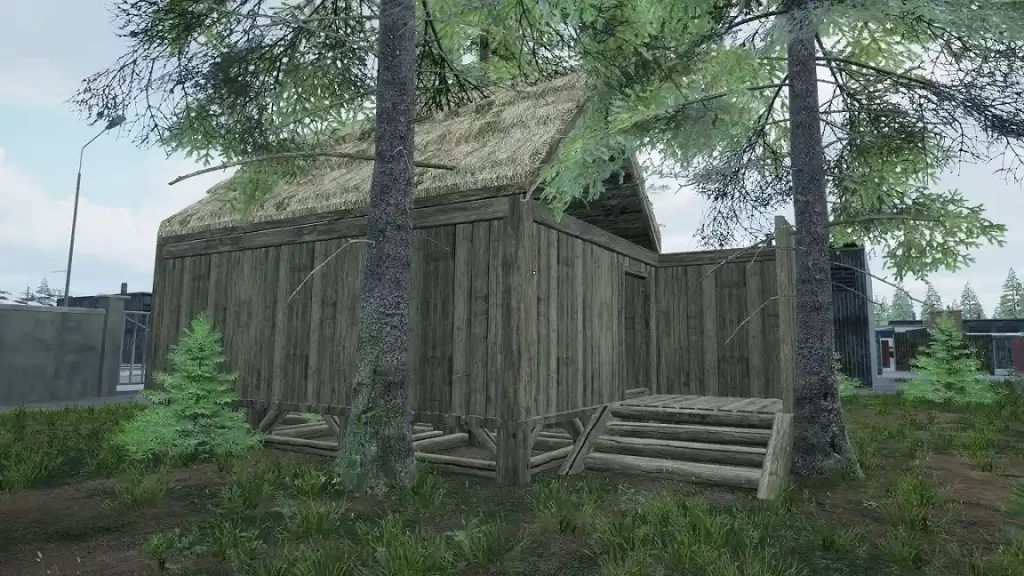 New players have various challenges before they can build efficiently. Remember, building in No One Survived is about resource, inventory, and weight management.
In other words, ensure you have the necessary resources to build structures. Next, move the items in your limited inventory space to fit them. Finally, manage your weight as your character’s movement speed slows down significantly when encumbered.
Assuming that you picked a location and want to build a startup base, you can create one using the following items: 7x Wood Foundation, 5x Wood Uprights, 11x Wooden Wall, 6x Thatched Roof, 2x Beam (2x1), 2x Beam (3x1), and 1x Wood Wall (Door Frame).
It’s important to mention that this building won’t look like a million-dollar mansion, but it can be a good place for beds, crafting stations, and storage containers.
Also, here are the materials needed to craft each building item:
New players have various challenges before they can build efficiently. Remember, building in No One Survived is about resource, inventory, and weight management.
In other words, ensure you have the necessary resources to build structures. Next, move the items in your limited inventory space to fit them. Finally, manage your weight as your character’s movement speed slows down significantly when encumbered.
Assuming that you picked a location and want to build a startup base, you can create one using the following items: 7x Wood Foundation, 5x Wood Uprights, 11x Wooden Wall, 6x Thatched Roof, 2x Beam (2x1), 2x Beam (3x1), and 1x Wood Wall (Door Frame).
It’s important to mention that this building won’t look like a million-dollar mansion, but it can be a good place for beds, crafting stations, and storage containers.
Also, here are the materials needed to craft each building item:
- Wood Foundation: 6x Log
- Wooden Wall: 8x Plank and 2x Wooden Stick
- Thatched Roof: 4x Plank and 10x Plant Fibers
- Wood Uprights: 2x Log
- Beam (2x1): 2x Log
- Beam (3x1): 3x Log
- Wooden Wall (Door Frame): 8x Plank and 2x Wooden Stick

您对这篇博客有何评价?
分享您的看法,帮助我们将博客做得更好!
不喜欢
一般
喜欢

需要游戏服务器吗?
租用一台游戏服务器,您可以和朋友们在极低延迟和自定义设置下私密游玩。从 110+ 款游戏中挑选您的最爱,邀请全球玩家,享受私密对战,或者按照您自己的规则建立属于您的在线社区。





获取第一手独家资讯!
订阅我们的电子邮件,获取有关我们托管游戏、公司新闻和独家优惠的最新动态。随时掌握一手资讯!