Hytale Teleporter Guide: How to Build & Use Teleporters
Publié le par

Partager :

Partager sur X

Partager sur Facebook

Partager sur Threads

Partager sur Bluesky

Copier dans le presse-papiers

Partager par e-mail
There's more than one way to zip around the world of Hytale. You can use a glider, you can (kind of) tromp around on mounts, and you can also use teleporters. Here we'll tell you everything you need to know about how to build and use teleporters in Hytale so you can spend more time adventuring than walking!
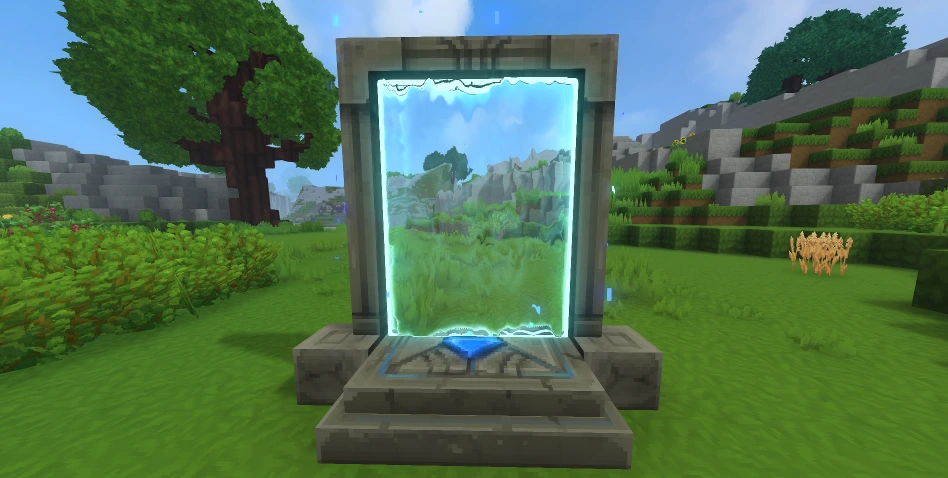 First things first: you need a teleporter before you can use a teleporter. Some of the materials you'll need are fairly rare. As a result, don't expect to hop in and start crafting teleporters right away. Before you can bend the fabric of space to your will, you'll need an Arcanist's Workbench.
First, you need to upgrade a standard Workbench to Tier 2 with the following:
First things first: you need a teleporter before you can use a teleporter. Some of the materials you'll need are fairly rare. As a result, don't expect to hop in and start crafting teleporters right away. Before you can bend the fabric of space to your will, you'll need an Arcanist's Workbench.
First, you need to upgrade a standard Workbench to Tier 2 with the following:
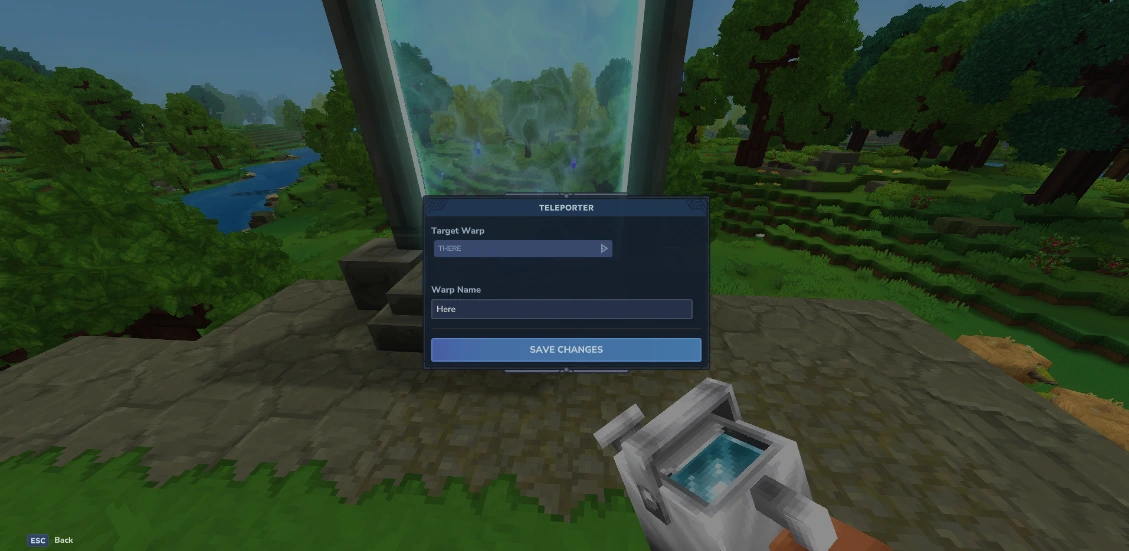 Once you've crafted your teleporter, you're still not ready to zip around. You need at least two teleporters planted in the world before you can use one. Once you have your teleporters planted, simply interact with them. Then, a small teleporter menu will open. Here you can set the name of the current teleporter you're using in the bar labeled "Warp Name," and you can choose the teleporter you'll travel to from the drop-down menu labeled "Target Warp."
Having a drop-down menu for only two teleporters might seem strange, but that's because you can place up to eight teleporters once you meet the right conditions. To earn the ability to place more teleporters, you need to gather memories using the Forgotten Temple.
This is how many memories you need to unlock more teleporters:
Once you've crafted your teleporter, you're still not ready to zip around. You need at least two teleporters planted in the world before you can use one. Once you have your teleporters planted, simply interact with them. Then, a small teleporter menu will open. Here you can set the name of the current teleporter you're using in the bar labeled "Warp Name," and you can choose the teleporter you'll travel to from the drop-down menu labeled "Target Warp."
Having a drop-down menu for only two teleporters might seem strange, but that's because you can place up to eight teleporters once you meet the right conditions. To earn the ability to place more teleporters, you need to gather memories using the Forgotten Temple.
This is how many memories you need to unlock more teleporters:
How to Build Hytale Teleporters
First things first: you need a teleporter before you can use a teleporter. Some of the materials you'll need are fairly rare. As a result, don't expect to hop in and start crafting teleporters right away. Before you can bend the fabric of space to your will, you'll need an Arcanist's Workbench.
First, you need to upgrade a standard Workbench to Tier 2 with the following:
- Copper Ingot: 30
- Iron Ingot: 20
- Linen Scraps: 20
- Thorium Ingot: 10
- Linen Scraps: 30
- Essence of Void: 20
- Azure Kelp: 2
- Azure Logs: 8
- Stone of Any Kind: 10
How to Use Hytale Teleporters
Once you've crafted your teleporter, you're still not ready to zip around. You need at least two teleporters planted in the world before you can use one. Once you have your teleporters planted, simply interact with them. Then, a small teleporter menu will open. Here you can set the name of the current teleporter you're using in the bar labeled "Warp Name," and you can choose the teleporter you'll travel to from the drop-down menu labeled "Target Warp."
Having a drop-down menu for only two teleporters might seem strange, but that's because you can place up to eight teleporters once you meet the right conditions. To earn the ability to place more teleporters, you need to gather memories using the Forgotten Temple.
This is how many memories you need to unlock more teleporters:
- 2 Teleporters: 0 Memories
- 3 Teleporters: 25 Memories
- 4 Teleporters: 50 Memories
- 6 Teleporters: 100 Memories
- 8 Teleporters: 200 Memories
Créez votre propre
serveur Hytale
serveur Hytale
Choisissez un plan, sélectionnez un jeu et jouez avec vos amis !
Abonnez-vous à notre newsletter
Abonnez-vous pour recevoir les dernières mises à jour sur l'univers du jeu vidéo !

Rejoignez notre Discord
Rejoignez notre communauté de plus de 20 000 membres passionnés !
Comment évalueriez-vous ce blog ?
Partagez votre avis et aidez-nous à améliorer nos blogs !
Pas aimé
Neutre
Aimé

Besoin d'un serveur de jeu ?
Louez un serveur de jeu où vous et vos amis pouvez jouer en privé avec une faible latence et des paramètres personnalisés. Choisissez parmi 110+ jeux, invitez des joueurs du monde entier et profitez de parties privées, ou créez votre propre communauté en ligne avec vos propres règles.

Blogs pertinents







OBTENEZ LES DERNIÈRES INFOS !
Inscrivez-vous à nos e-mails pour obtenir des mises à jour sur nos jeux hébergés, des nouvelles de l'entreprise et des offres exclusives. Restez au courant !